Assigning Contacts to Groups
How to segment contacts to send targeted communications
Grouping your contacts allows for targeted communication with clients and prospects. For example, you can easily send your "Video of the Month" Automation to a specific group or a custom email to contacts in a particular city or neighborhood. By adding contacts to a group, you can quickly send messages to just those individuals.
⛔ Before you begin:
If you're using a CRM like Salesforce, Redtail, Wealthbox, or SmartOffice, you cannot manage or create groups within FMG. Group management must be done within your CRM. For more information, please refer to this article: Supported CRM Integrations.
Methods to Assign Contacts to a Group:
Import a CSV
If you have a large number of contacts and want to assign many of them to a new group, the easiest way is to export your contacts, update the CSV, and re-import it.
- Navigate to Contacts >> Manage Contacts:

- On the Contacts page, click the gear icon and select the option to "Export CSV." All your contacts will be exported, and a CSV will be downloaded to your browser.

- Open your CSV and find the "Groups" column. Add your new group(s) to this column, separated by a comma.
- 💡You can add a user to as many groups as you need. Include them all in the "Groups" column, and be sure to separate each group name with a comma.
- ❓If you haven't set up any groups yet, you may need to add a "Groups" column to your CSV.

- Save your CSV, navigate back to the Contacts page, click the gear icon, and this time select "Import CSV."

-
Drag and drop your CSV file or click "Browse Files" to search for the file
-
Select "Update and add to existing contacts"
-
Click "Upload" when you are ready to proceed
-
Map your contacts and complete the import:
-

🎉 Your contacts will automatically be organized into the corresponding groups in your FMG account. Additionally, if you upload a CSV file containing the same contacts, the system will not create duplicates. Instead, it will automatically update any existing contact with the details from the CSV file.
Manually Assign Contacts to a Group
To manually assign contact(s) to a group:-
Navigate to Contacts >> Manage Contacts:

-
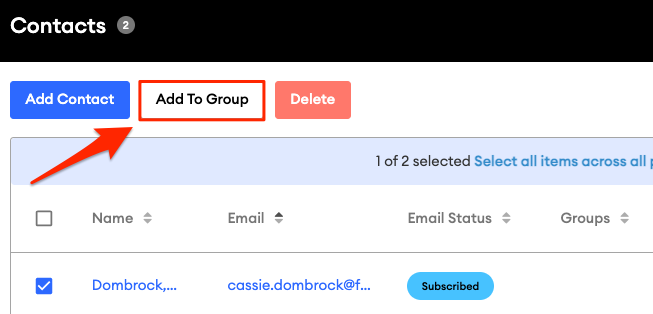
Select the user(s) you want to add to your group by clicking on the checkbox next to their name:

Note: You can do this multiple times—there is no need to find and select all the applicable users at once.
-
Click "Add to Group" and either assign the users to an existing group or create a brand new group.

Now, you're ready to send emails to specific groups! For more information, explore these related articles:
Creating and Sending a Custom EmailSelecting an Audience for Automated Marketing