Perhaps you don't have a CRM, or you manage your contacts with an Excel sheet. You can easily add them to your FMG contact list by following these simple steps!
Quick Video Tutorial
For a quick overview of uploading contacts, watch this short video first:
If you've previously exported contacts from your admin system as a CSV file and are looking to update these existing contacts while adding new ones, this guide walks you through the bulk update process.
In this article, we will review:
- How to Prepare Your Contact List
- How to Upload a CSV File to Add Contacts
- Frequently Asked Questions (FAQs)
Looking to add individual contacts manually? Click here to learn more.
How to Prepare Your Contact List
Before you can import your contacts, it's essential to ensure that your contact list is properly formatted. Proper preparation will streamline the import process and minimize potential errors.
Contacts can only be imported if they include an email address and/or complete physical address. This is important for ensuring that your contacts can be effectively reached through your desired communication channels.
Ensure your contact list contains all the necessary details:
- Download a Sample CSV File: Click here to download a sample CSV file. This file will illustrate all the possible fields you can include for each contact. Although not all fields are required, they offer flexibility in the type of information you can store.
- Note: If your contact list was exported from a CRM, it might contain additional fields, such as "Company Name." It is recommended to remove these extra columns from your file before uploading it.
Columns in the sample CSV:
| Column Name | Required/Optional | Notes |
| First Name | Required | Must split full names into separate columns for first and last names |
| Last Name | Required | Must split full names into separate columns for first and last names |
| Nickname | Optional | Include if you prefer to use a nickname instead of the first name |
| Gender | Optional | |
| Birth Date | Optional | |
| Client Anniversary | Optional | |
| Marital Status | Optional | |
| Email* | Required | Email is required for contacts to receive emails, but not required to send greeting cards |
| Phone | Optional | |
| Address 1* | Optional | While Address 1 is not required, a complete address is necessary to send a greeting card |
| Address 2 | Optional | |
| City | Optional | |
| State (or Province) | Optional | When uploading a CSV, use the state's abbreviation instead of spelling out the full state name, as the latter will not be accepted. |
| Postal Code | Optional | |
| Groups | Optional |
|
Remember, the column headers in your CSV file do not need to match the sample above. You will have the opportunity to "map" your data to these categories upon import. Learn more about mapping below.
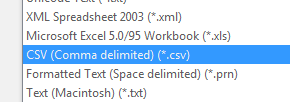
Make sure to save your Excel document as a CSV file.
How to Upload a CSV File to Add Contacts
Once your contacts are saved as a CSV file, you can proceed with the upload process.- With your CSV file ready, access your FMG admin and navigate to Contacts > Manage Contacts.

- On the Contacts page, under "Import Your Contacts," click "Import a .csv"

- You can drag and drop your CSV file or click "Browse Files" to locate it. When you are ready, click " Upload."

- You'll then map the columns in your CSV to the corresponding contact fields in your admin. A preview on the right will show how your settings apply to the import.

- Once satisfied with the preview, finalize the process by clicking "Upload Contacts."
Frequently Asked Questions (FAQs)
Q: Do CSV Imports Allow for Duplicate Contacts?
A: Yes, duplicate contacts are allowed with CSV file imports. Duplicate contacts can be created if multiple contacts share the same email address but have different first names in the CSV file import. Learn more about duplicate contacts here.
Q: Can I import another CSV file after previously importing one or adding contacts manually?
A: Yes, you can import another CSV file and add new contacts without affecting existing ones. You can also update current contacts using a CSV import, which is useful for bulk updates. Remember, each file must be uploaded separately to ensure accurate field mapping.