- Enable the FMG Integration in SmartOffice
- How to Sync Ebix SmartOffice Contacts to Your FMG Account
- Updating Sync Settings
- Sync Results
- Field Mapping
- Contact Limits
- Editing Contacts and Groups
- Deceased Contacts
Before you begin:
- Retail Customers: If you are an Ebix SmartOffice Retail customer, enable the FMG Integration within the SmartOffice application before connecting FMG to SmartOffice.
- Enterprise Customers: If this option is not available, contact Ebix directly for assistance.
Important Note: SmartOffice is designed to be integrated with only one FMG account. Integrating multiple FMG accounts to a single SmartOffice instance can cause issues with your FMG contact list.
-
In SmartOffice, navigate to your User Accounts.
-
Open your user.
-
Select User Rights, and in the Integrations section, check FMG.
To sync Ebix SmartOffice contacts with your FMG account:
-
Access the Contacts Page: In your FMG admin, navigate to Contacts > Manage Contacts in the navigation pane on the left side of your dashboard:

-
Initiate Sync: Click "Sync Ebix SmartOffice" under Import Your Contacts

-
Authenticate: Log into your Ebix SmartOffice account. This is a one-time authentication process to enable successful syncing.
-
Configure Sync Settings: In the "Ebix CRM Synchronization" modal, select your preferences:
-
What Would You Like To Sync From Ebix SmartOffice?: Decide which contacts from Ebix SmartOffice you want to add to FMG. You can either sync all your contacts or only those within specific tag groups.
-
Sync Frequency: For automatic daily updates, check the box to enable automatic syncing (recommended). If you prefer manual updates, you can initiate an on-demand sync from your Contacts page at any time.
-
Sync FMG Activity: Check the box in this section if you want FMG to write a SmartPad note to Ebix SmartOffice each time:
-
A website form is completed
-
An email is sent
-
Someone opts out of your emails
-
-
⚠️ During the syncing process, all existing contacts in your FMG admin will be replaced with your Ebix SmartOffice contacts. If you have contacts in FMG that aren't in Ebix SmartOffice, export them and add them to Ebix SmartOffice before syncing.
Canceling a Pending Sync
If your CRM integration keeps spinning or gets stuck without completing the sync, you can cancel it by clicking the down arrow menu and selecting "Cancel Sync Attempt." This will stop the sync, allowing you to attempt the CRM integration again. 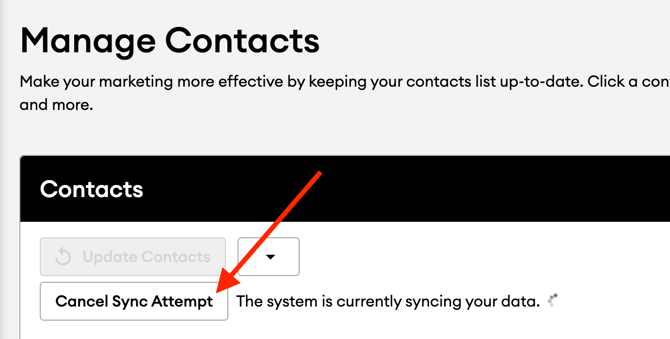
Sync Results
Once your SmartOffice sync is complete, you can access a sync results page. To do this, select the arrow dropdown next to "Update Contacts" and select "View last sync results":

This page lists all valid contacts available through your integration. Each row shows the contact's name, the sync status (synced or not synced), and a message explaining any unsuccessful syncs. You can search for a contact using the search bar by entering their first or last name.
To update your sync settings after your initial integration:
-
In your FMG admin, navigate to Contacts > Manage Contacts in the navigation pane on the left side of your dashboard.
-
Select the arrow dropdown next to "Update Contacts" and select "Update current settings."

-
You can then update the contact settings in the "Ebix CRM Synchronization" modal.
Here is how Ebix SmartOffice contact fields map to an FMG contact:
|
Ebix SmartOffice Field |
FMG Field |
|
First Name |
First Name |
|
Last Name |
Last Name |
|
Preferred Email Address |
Email Address |
|
Preferred Address Line 1 |
Address 1 |
|
Preferred Address Line 2 |
Address 2 |
|
Preferred Address City |
City |
|
Preferred Address State |
State |
|
Preferred Address Zip Code |
Zip |
|
Preferred Phone Area Code + Number |
Phone Number |
|
Birth Date |
Birthday |
|
Gender |
Gender |
|
Marital Status |
Marital Status |
|
Review Date |
Client Anniversary |
|
Greeting |
Nickname |
Contact Integration is limited to 30,000 contacts and/or 1,000 groups in your Ebix database, regardless of how many are selected to sync. Attempts to sync databases over this size limit will fail.
Editing Contacts and Groups
Once your Ebix SmartOffice CRM has been integrated, you cannot edit your contacts/groups or add new contacts/groups manually from your FMG account.
You must make these changes from your Ebix SmartOffice account. If your sync frequency is set to automatically sync daily, these changes will automatically sync to your FMG account.
🚧 If you initially configured your CRM integration to sync only certain tag groups, any new tag groups you create in Ebix will not automatically sync. You must manually update your selected tag groups within your sync settings in FMG to include these new groups in your FMG account.
Deceased Contacts
The SmartOffice integration does not support the automatic removal of deceased contacts. To ensure these contacts stop receiving emails, you must manually unsubscribe them from your FMG contact list.