
MyRepChat automatically finds new contacts by phone number as messages and calls come in, so in most cases there's little need to bulk-import your entire CRM. Large bulk imports can strain MyRepChat, your CRM, or your CRM's API, and may lead to a poor experience — we generally recommend searching for contacts or groups as you need them instead.
That said, some CRMs have limited search behavior (see that CRM's integration article for details), or you may simply prefer to import everything at once. This article walks through that process: exporting from your CRM, importing into MyRepChat, and linking contacts so MyRepChat writes notes back to your CRM.
Bulk import depends entirely on a unique SourceID column to make the connection to your CRM. MyRepChat cannot verify that the ID you enter actually matches a real CRM record — an import can show the CRM logo on a contact even when the SourceID doesn't match anything, meaning notes still won't write back. Always test with a small batch (5–10 rows) first, and confirm notes are actually appearing in your CRM — not just that the logo appears — before running a full import.
Step 1: Set Up and Test Your CRM Integration
- Go to Settings > Integrations > Connect to CRM.
- Confirm your CRM's tile shows a green checkmark, meaning it's integrated. If not, set up the integration first — see the dedicated setup article for your CRM.
- Turn on both Enable and Real Time notes settings, if available. Real-time notes let you test immediately instead of waiting overnight.
- Click Test to confirm the integration is working — a status message will appear in a bar or pop-up.
- Manually pull in a few contacts from your CRM and send test messages to confirm notes are writing back correctly before continuing.
Step 2: Prepare Your Import File
Export your CSV with a unique contact ID and mobile number. Most CRM exports include a unique contact ID column by default; others require you to add it manually or combine two fields. Make sure your final file has a column (often named "Contact ID" or "Person ID") that MyRepChat can use as the SourceID.
Also include a Mobile number column — this becomes the contact's messaging number in MyRepChat. Choose a CRM field you're confident is mostly or entirely mobile numbers, formatted as 10 digits in a row with no dashes, spaces, or parentheses.
Add a "Source" column. Manually add a column named Source and enter your CRM's name (in lowercase) in every row — see the Appendix below for the correct value per CRM.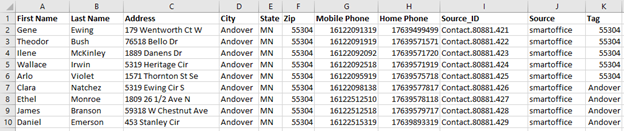
Before importing, check your file for these common issues:
- No commas anywhere in the file — these will break the import.
- No leading or trailing spaces on any field, especially the mobile number or SourceID.
- Leading or trailing zeros on phone numbers or SourceIDs — Excel can silently strip these during formatting, breaking the CRM match. Test a row that has one before running the full import.
- Mobile and phone numbers must be exactly 10 digits, with no dashes or parentheses.
The recommended columns for import are:
- First Name
- Last Name
- Mobile
- Tags
- Source
- Source ID
What do these columns actually do?
- Mobile: Becomes the contact's messaging number in MyRepChat. If you link your file's phone data to "Phone" instead of "Mobile," MyRepChat won't recognize it as a messaging number, and you'll need to set it manually afterward.
- Tags: Adds the contact to a group. Separate multiple groups with the pipe symbol (
|). To move a contact to a different group later, re-import the same row with an updated Tag value. - Source ID: Your CRM's unique ID for that contact — this may need to combine two export fields using a
CONCATENATEfunction. Confirm the correct field with your CRM provider and the Appendix below. - Source: The CRM's name, entered manually in lowercase. This tells MyRepChat which CRM logo to display — but the logo alone doesn't guarantee notes are syncing; that depends on the SourceID being correct.
Step 3: Link Fields and Import
- In MyRepChat, go to Contacts > Add Contact or Group and select Import contacts and groups from CSV.
- Choose your prepared file. A CSV Summary box confirms the number of rows to be imported. Click Close.
- Link each MyRepChat Target field to its matching CSV Source field, one at a time:
- Click a Target field (it turns red).
- Click its matching CSV Source field (it turns red).
- Click Link. Both fields turn green to confirm the connection.
- Repeat for each field you need to map.
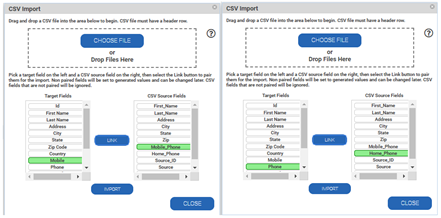
- Once every field is linked, click Import.
Import speed depends on your file size and your CRM's API — this can take a while for larger imports. Let it finish, then refresh your browser before reviewing the results.
Step 4: Verify Your Contacts Loaded Correctly
- Refresh your browser and go to Contacts. Imported contacts should show the CRM logo, and any groups from your Tags column should be visible.
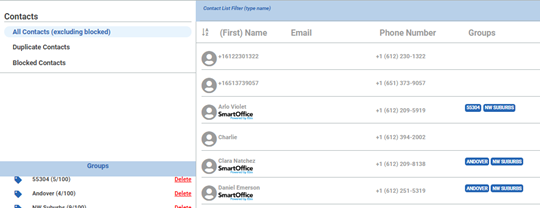
- Send a few test messages to confirm notes are actually appearing in your CRM — not just that the logo is showing. Note: If a mobile number wasn't formatted correctly, re-importing with the fix will create a new, separate contact record — MyRepChat won't recognize it as a duplicate of the incorrect one. Be sure to manually delete the old, incorrectly formatted contact.
- Double-check that any group Tags applied during import are showing up correctly in your groups list.
Appendix: CRM Source Names and Unique ID Fields
Export fields, Source Name and SourceID Formats by CRM system: To Date, these are the formats we’re aware of; we recommend contacting your CRM support team to confirm which fields to pull in the export, and doing a test load into MyRepChat.
| UniqueID Export Fields | Example SourceID Column | Source Column CRM Name |
| Contact.SystemCode.ContactCode | Contact.65912.9861 | smartoffice |
| RecordID_PersonID | g8546325-e525-3fba-b95c-b28k5297834f_e856fhf5-b40d-695a-b851-n59a188628b1 | junxure |